Like most programmers I’m a hierarchical sort of a chap. When it comes to ordering data often the most logical pattern most data falls into is a tree layout.
One of the first items I looked for in x-code was a tree view and of course there is wasn’t, it was hidden in plain sight. For the uninitiated (i.e. me) the relevant control is the NSOutlineView. That’s the view that you see on the left hand side of iTunes.
The NSOutlineView is based on the NSTableView and has a wealth of options that control the layout and appearance of the view. In this first post let’s keep things simple and build a very basic tree of text nodes.
Getting started
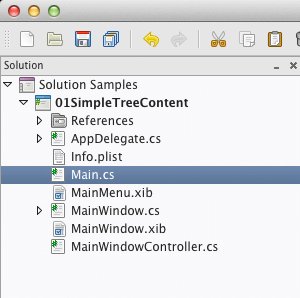
We will create a fresh monomac project and work in that. In our sample solution it’s called 01SimpleTreeContent.
Over first port of call is Xcode so double click MainWindow.xib and wait for the designer to open. In the object library search for the string outline and drag an NSOutlineView control onto your window.
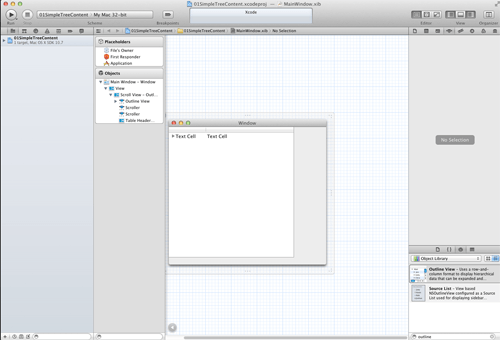
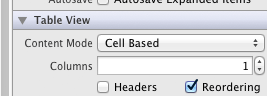
Select your NSOutlinView and make the following changes
- Set number of columns = 1
- Content mode = “Cell Based”
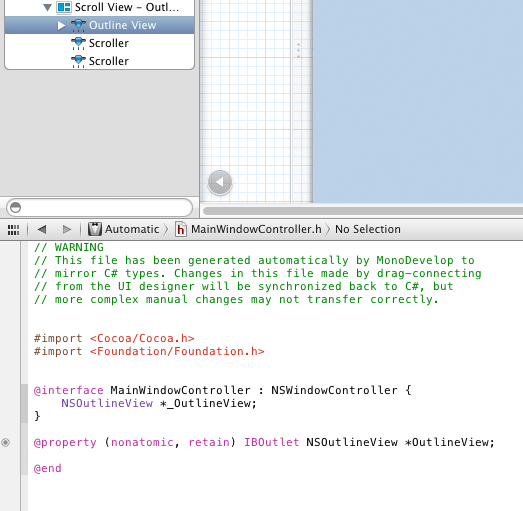
Select the NSOutlineView and then create an outlet for it in the MainWindowController.h file by control-dragging from the outline view to the .h file.
Close Xcode and then go back to mono-develop.
Creating a data source
In this example we are going to bind our data to the NSOutlineView by setting its DataSource property to a class that implements the NSOutlineViewDataSource protocol from Cocoa. The data source is responsible for managing the data (d’uh) and supplying it to the view on demand. In a future post we will look at automating this process further using an NSTreeController and key value bindings. But for now we will keep it simple.
Let’s define a class to store our domain data, the important thing to note here is that it has to derive from NSObject:
public class Node : NSObject
{
	public Node ()
	{
		Children = new List<Node>();
	}

	public Node (string name) : this()
	{
		Name = name;
	}

	public bool IsRoot { get; set; }
	public string Name { get; set; }
	public List<Node> Children { get; set; }
}
To implement our simple data source we need to derive a class from NSOutlineViewDataSource and implement 4 methods these are:
public override int GetChildrenCount (NSOutlineView outlineView, NSObject item)
{
	Node node =  item as Node;
	return item == null ? 1 : node.Children.Count;
}
The passed in object is either null for the top level node (in which case we return a fixed value of 1 for this simple example), or an NSObject that we can cast to our Node class and return the child count.
As the NSOutlineView is populated the view calls the data source to get node data via the GetChild method:
public override NSObject GetChild (NSOutlineView outlineView, int childIndex, NSObject ofItem)
{
	Node node = ofItem as Node;
	return ofItem == null ? RootNode : node.Children[childIndex];
}
The ofItem parameter is passed as null in the first case to signal that the tree is after the root node(s), otherwise we return the child count of our Node object.
Two final methods round out the data source. When rendering each item the view need to know if the current node has children so it can render the disclosure triangle. To ask that question the view calls the following data source method:
public override bool ItemExpandable (NSOutlineView outlineView, NSObject item)
{
	Node f = item as Node;
	return item == null ? true : f.Children.Count >0;
}
Which as in the previous examples returns true always for the root node (when item is null) otherwise it checks the child count of the node and returns true/false as appropriate.
The last method we implement handles the ‘minor’ matter of telling the view what data we actually want to display (at last you say). In our example we only have one column in the view so we ignore the forTableColumn argument. If you need to support multiple columns just switch on the column and return the corresponding column value.
public override NSObject GetObjectValue (NSOutlineView outlineView, NSTableColumn forTableColumn, NSObject byItem)
{
		Node f = byItem as Node;
		return new NSString(f.Name);
}
In the constructor of the datasource we create some dummy data and assign that to the RootNode property of our class.
private Node RootNode {get; set;}
public SimpleDataSource ()
{
RootNode = RootNode = new Node()
{
Name = "The root node",
Children = new List<Node>(),
IsRoot = true
};
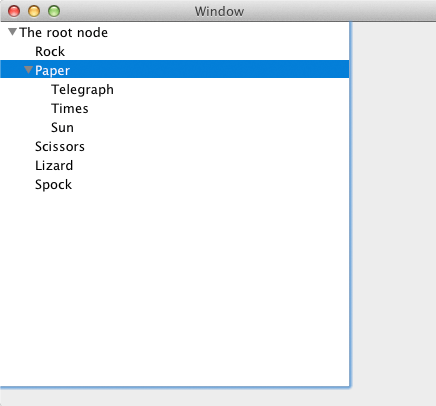
Node paper;
RootNode.Children.Add(new Node("Rock"));
RootNode.Children.Add(paper = new Node("Paper"));
RootNode.Children.Add(new Node("Scissors"));
RootNode.Children.Add(new Node("Lizard"));
RootNode.Children.Add(new Node("Spock"));
paper.Children.Add(new Node("Telegraph"));
paper.Children.Add(new Node("Times"));
paper.Children.Add(new Node("Sun"));
}Wiring it all up
In MainWindowController.cs we need to bind our NSOutLineView to a new SimpleDataSource instance. Here we use the WindowDidLoad override from the NSWindowController base class:
public override void WindowDidLoad ()
{
	base.WindowDidLoad ();
	OutlineView.DataSource = new SimpleDataSource();
}
Now run the app and we should get:
Yeah!, or Meh, your millage may vary. In a later post we’ll pretty this up with custom cells, badges etc. Download the source code.